Overview
The Record Now Studio is a do-it-yourself, self-service one-button production studio that provides space for presentation recording. The studio has the capability for green or blue screen recording, touch screen display, PowerPoint presentations and more. The space is available to anyone affiliated with CU Anschutz.
Directions to Studio
The Record Now Studio is located on the 3rd floor of the Strauss Health Sciences Library. Take the south elevator or stairs past the Service Desk to the third floor and follow the signs for the studio posted on the doorways.
Create in these simple steps!
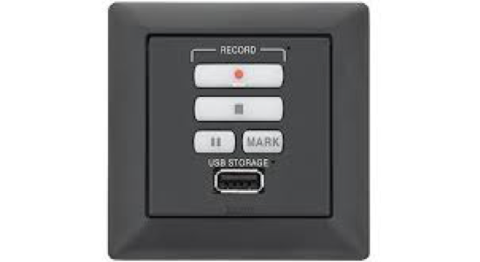
- Insert your (non-encrypted) USB drive into "USB Storage" to activate the studio lights.
- Press the RECORD button to start recording.
- Press the PAUSE button to pause recording.
- Press the MARK button to insert a chapter mark.
- Press the STOP button to stop recording. (LED will stop flashing when file is saved to USB drive.)
- Remove USB drive from the "USB STORAGE" to deactivate the studio lights when you are done recording.
Things to Know Before You Go
- The studio is do-it-yourself, self-service with instructions provided in the room.
- You must bring your own (non-encrypted) USB drive with a minimum of 2GB free (1GB is ONLY 12 minutes recording time). A drive with at least 3-4GB free is recommended to save your recording. No warning issued if your USB drive runs out of space. The (non-encrypted) USB drive must be formatted: FAT32, or NTFS.
- There is NO FOOD OR DRINK allowed in the studio.
- There is no editing software provided in the studio.
What can I do with the Record Now Studio?
- Rehearsing for class presentations in any discipline
- Creating online course introductions
- Recording an interview with one or more participants
- Creating video essays
- Practicing your public speaking and language skills
- Using the green/blue screen to create visual effects
- Creating videos for online instruction
- Creating videos for recruitment, training, or professional development seminars
Creating Accessible Videos
Videos should be produced and delivered in ways that ensure that all members of the audience can access their content. An accessible video includes captions, a transcript, and audio description and is delivered in an accessible media player.
Captions
Captions are text versions of the audio content, synchronized with the video. They are essential for ensuring your video is accessible to students, employees, and members of the public who are deaf or hard of hearing. They also help non-native English speakers to understand the video, make it possible to search for content within the video, help all students learn the spelling of technical terms spoken in the video, and make it possible to generate an interactive transcript where users can click anywhere in the transcript to watch the video where that text is spoken.
To caption your video for free, please visit these resources:
For more information about digital accessibility at the University of Colorado, please see the University's policy, APS 6011.
Feedback
Use the AskUs form to submit feedback or issues you may be having with the Record Now Studio.